Author: Sam

  • 2015 Touring – HYDRAULIC CLUTCH RELEASE BEARING AND PUSHROD – REMOVAL

    1. Remove seat.

    To prevent accidental vehicle start-up, which could cause death or serious injury, disconnect negative (-) battery cable before proceeding. (00048a)

    2. Remove negative cable from battery.

    3. See Figure 5-42. Remove clutch inspection cover.

    4. See Figure 5-41. Remove bearing plate retaining ring (1).

    5. Pull out release bearing plate (3) with release bearing (4) and release rod (5). Remove pushrod if necessary.

    6. Remove release rod retainer (2).

    7. Press release rod from bearing.

    8. Press release bearing out of bearing plate.


  • 2015 Touring – CLUTCH: ASSIST AND SLIP – CLUTCH PACK ONLY

    Partial Disassembly

    This procedure can be performed without removing the clutch shell or hub. For replacement of the shell or hub, see 5.6 CLUTCH: CONVENTIONAL, Clutch Pack and Bearing.

    1. Remove primary chaincase cover. See 5.3 PRIMARY CHAINCASE COVER, Removal.

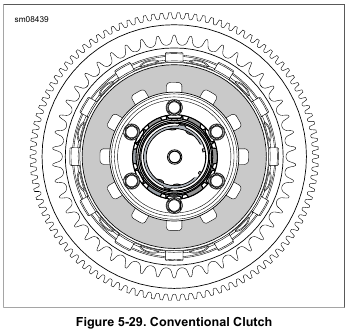
    2. See Figure 5-39. Remove three bolts (1) to release stopper plate (2) from clutch hub (6). Loosen each bolt gradually and in a star sequence around the hub.

    NOTE

    Do not lose the coil spring seats (5).

    3. Remove stopper plate, three coil springs (4), coil spring seats and pressure plate (11) from clutch hub.

    4. Remove the three spring seats from the clutch pressure plate.

    5. Remove friction plates (12,14), steel plates (13) from clutch hub.

    Cleaning And Inspection

    Compressed air can pierce the skin and flying debris from compressed air could cause serious eye injury. Wear safety glasses when working with compressed air. Never use your hand to check for air leaks or to determine air flow rates. (00061a)

    1. Wash all parts in cleaning solvent, except for friction plates and bearing, if removed. Dry parts with low-pressure, compressed air.

    NOTE

    Replace any damaged spring seats.

    2. Check friction plates:
    a. Use compressed air to remove all lubricant from the friction plates. Do not wipe off with a rag.
    b. Measure the thickness of each plate.
    c. If the thickness of any plate is less than 0.143 in (3.62 mm), replace with a complete new set.
    d. Look for worn or damaged fiber surface material (both sides).

    NOTE

    Friction plates and steel plates are only sold as a kit.

    3. Check the steel plates:
    a. Discard any plate that is grooved or bluish in color.
    Blue plates are likely warped or distorted.
    b. Check each plate for distortion. Lay the plate on a precision flat surface. Insert a feeler gauge between the plate and the flat surface in several places.
    Replace any steel plate that is warped more than 0.006 in (0.15 mm).

    4. Hold the clutch hub and rotate the clutch shell to check bearing for smooth operation. Replace the bearing if it runs rough, binds or has any end play. See 5.6 CLUTCH: CONVENTIONAL, Clutch Pack and Bearing.

    5. Replace clutch shell if primary chain sprocket or starter ring gear are worn or damaged.

    6. Replace clutch hub and shell if slots for clutch plates are worn or damaged.

    7. Replace coil springs and stopper plate if either are cracked or bent.

    Assembly

    NOTE

    Submerge and soak all friction plates in primary chaincase lubricant for at least five minutes.

    1. Install the three spring seats in the clutch pressure plate.

    NOTE

    Verify that there are two narrow friction plates with a narrow steel plate between them on the clutch pressure plate during assembly.

    2. See Figure 5-39. Install a narrow friction plate (14), then a narrow steel plate (13), then narrow friction plate on the pressure plate (11).

    3. Install a narrow friction plate (14) and then a steel plate (13) on the clutch hub (6). Install seven remaining sets in the same manner, alternating between steel plates and friction plates.

    4. Install clutch hub/plate assembly into the clutch shell, aligning the tabs as they enter.

    NOTES

    • The pressure plate is installed properly when the stopper plate bolts (1) will start into the clutch hub without distorting the stopper plate.

    • Alternately tighten the three bolts 1-2 turns to prevent damage to the stopper plate.

    • Verify the pressure plate splines are aligned with the splines on the hub.

    5. Install pressure plate/plate assembly to the clutch hub.
    Rotate pressure plate to align holes with threaded bosses on hub.

    6. Install three coil springs (4) in pressure plate.

    7. Align holes in stopper plate (2) with threaded bosses on clutch hub. Install stopper plate.

    8. Install three bolts (1) (metric) to secure stopper plate and coil springs to clutch hub. Alternately tighten to 70-100 in-lbs (7.9-11.3 Nm).

    NOTE

    Always install a new gasket between primary cover and housing. Not replacing this gasket may cause primary chaincase leaks.

    9. Install primary chaincase cover. Fill primary chaincase.
    See 5.3 PRIMARY CHAINCASE COVER, Removal.


  • 2015 Touring – CLUTCH: ASSIST AND SLIP – CLUTCH IDENTIFICATION

    To remove the clutch without disassembly or for installation instructions, see 5.4 DRIVE COMPONENTS, Removal.

  • 2015 Touring – CLUTCH: CONVENTIONAL – CLUTCH PACK AND BEARING

    Complete Disassembly

    1. Remove the primary chaincase cover. See 5.3 PRIMARY CHAINCASE COVER, Removal.

    2. Remove clutch assembly. See 5.4 DRIVE COMPONENTS, Removal.

    3. Follow all partial disassembly information under 5.6 CLUTCH: CONVENTIONAL, Clutch Pack Only.

    Wear safety glasses or goggles when removing or installing retaining rings. Retaining rings can slip from the pliers and could be propelled with enough force to cause serious eye injury. (00312a)

    NOTE

    Do not disassemble the clutch shell and hub assembly unless the bearing, hub or shell require replacement. Replace the bearing if disassembled.

    Wear safety glasses or goggles when removing or installing retaining rings. Retaining rings can slip from the pliers and could be propelled with enough force to cause serious eye injury. (00312a)

    4. See Figure 5-32. Remove retaining ring.

    5. See Figure 5-33. Support clutch shell in arbor press with ring gear side up. Use a suitable press plug to press hub from bearing in clutch shell.

    6. See Figure 5-34. Remove retaining ring from groove in clutch shell bore.

    7. See Figure 5-35. Support clutch shell in arbor press with ring gear side is down. Use a suitable press plug to remove bearing.

    8. Clean and inspect components. See 5.6 CLUTCH: CONVENTIONAL, Clutch Pack Only.

    Assembly

    1. Place clutch shell in arbor press with ring gear side up. Support clutch shell bore on sprocket side to avoid damage to ears on clutch basket.

    2. Using a suitable press plug, press against outer race until bearing contacts shoulder in clutch shell bore.

    Wear safety glasses or goggles when removing or installing retaining rings. Retaining rings can slip from the pliers and could be propelled with enough force to cause serious eye injury. (00312a)

    3. See Figure 5-34. Install retaining ring with flat side toward bearing.

    4. Place clutch shell in arbor press with sprocket side up. Center hub in bearing. Support bearing inner race with a sleeve on transmission side.

    5. Press hub into bearing until shoulder contacts bearing inner race.

    6. See Figure 5-32. Turn assembly over. Install retaining ring in groove of clutch hub.

    7. Assemble clutch components. See 5.6 CLUTCH: CONVENTIONAL, Clutch Pack Only.

    8. Install clutch. See 5.4 DRIVE COMPONENTS, Installation.

    NOTE

    Always install a new gasket between primary chaincase cover and chaincase. Failure to replace this gasket may cause primary chaincase leaks.

    9. Install primary chaincase cover. Fill primary chaincase with lubricant. See 5.3 PRIMARY CHAINCASE COVER, Installation.


  • 2015 Touring – CLUTCH: CONVENTIONAL – CLUTCH PACK ONLY

    Partial Disassembly

    This procedure can be performed on the motorcycle without removing the clutch shell or hub.

    1. Remove primary chaincase cover. See 5.3 PRIMARY CHAINCASE COVER, Removal.

    2. See Figure 5-30. Remove six bolts (1) (metric) to release diaphragm spring retainer (2) from clutch hub. Loosen each bolt gradually and in a star sequence around the hub.

    3. Remove diaphragm spring retainer, diaphragm spring (3) and pressure plate (4) from clutch hub.

    4. Remove friction plates (5, 7), steel plates (6), damper spring (8) and damper spring seat (9) from clutch hub (11).

    Cleaning And Inspection

    Compressed air can pierce the skin and flying debris from compressed air could cause serious eye injury. Wear safety glasses when working with compressed air. Never use your hand to check for air leaks or to determine air flow rates. (00061a)

    1. Wash all parts in cleaning solvent, except for friction plates and bearing, if removed. Dry parts with low pressure compressed air.

    2. Check friction plates:
    a. Use compressed air to remove all lubricant from the friction plates. Do not wipe off with a rag.
    b. Measure the thickness of each plate with a dial caliper or micrometer.
    c. If the thickness of any plate is less than 0.143 in. (3.62 mm), discard all friction plates and replace with an entirely new set.
    d. Look for worn or damaged fiber surface material (both sides).

    NOTE

    Replace all nine friction plates with an entirely new set if any individual plate shows evidence of wear or damage.

    3. Check the steel plates:
    a. Discard any plate that is grooved or bluish in color.
    Blue plates are likely warped or distorted.
    b. Check each plate for distortion. Lay the plate on a precision flat surface. Insert a feeler gauge between the plate and the flat surface in several places.
    Replace any steel plate that is warped more than 0.006 in. (0.15 mm).

    4. Hold the clutch hub and rotate the clutch shell to check bearing for smooth operation. Replace the bearing if it runs rough, binds or has any end play.

    5. Inspect the primary chain sprocket and the starter ring gear on the clutch shell. Replace the clutch shell if either are badly worn or damaged.

    6. Check the slots that mate with the clutch plates on both the clutch shell and hub. Replace if slots are worn or damaged.

    NOTE

    Springs are identified by a dab of paint on one face. See the parts catalog to verify the correct spring is installed.

    7. Check the diaphragm spring and diaphragm spring retainer for cracks or bent tabs. Replace part if either condition exists.

    Assembly

    NOTE

    Submerge and soak all friction plates in primary chaincase lubricant for at least five minutes.

    1. See Figure 5-31. Install the narrow friction plate on the clutch hub.

    2. See Figure 5-30. Install damper spring seat (9) on clutch hub (11). It must sit inboard of narrow friction plate (7).

    NOTE

    See Figure 5-36. Notice damper spring (4) orientation with respect to damper spring seat (3).

    3. See Figure 5-30. Install damper spring (8) on clutch hub with the concave side facing away from damper spring seat.

    4. Install a steel plate (6) with round edge outward and then a friction plate (5) on the clutch hub. Install seven remaining sets in the same manner, alternating between steel plates and friction plates.

    5. Install pressure plate (4) on clutch hub aligning holes in plate with threaded bosses on hub.

    6. Seat diaphragm spring (3) in recess of pressure plate with the concave side inward.
    7. Align holes in diaphragm spring retainer (2) with threaded bosses on clutch hub. Tabs on spring retainer contact flats on inboard side of bosses.

    8. Install six bolts (1) (metric) to secure diaphragm spring retainer to clutch hub. Alternately tighten to 70-100 in-lbs (7.9-11.3 Nm).

    NOTE

    Always install a new gasket between primary chaincase cover and chaincase. Failure to replace this gasket may cause primary chaincase leaks.

    9. Install primary chaincase cover. Fill primary chaincase with lubricant. See 5.3 PRIMARY CHAINCASE COVER, Installation.


  • 2015 Touring – CLUTCH: CONVENTIONAL – REMOVAL AND INSTALLATION

    To remove the clutch without disassembly or for installation instructions, see 5.4 DRIVE COMPONENTS, Removal.

  • 2015 Touring – PRIMARY CHAINCASE HOUSING – INSTALLATION

    NOTE

    Cover mainshaft clutch hub splines with tape to prevent the splines damaging the inner primary cover oil seal.

    1. Verify pivot shaft torque. See 2.22 REAR FORK, Installation.

    NOTE

    See Figure 5-25. Dowels (1) in crankcase gasket (2) must engage holes in crankcase.

    2. See Figure 5-26. Position gasket on gasket surface (2).
    Verify dowels in gasket engage dowel holes (3).

    3. Spread a thin film of oil on mainshaft oil seal lip and rubber portion of crankcase gasket.

    4. Install chaincase. Avoid damaging mainshaft seal during installation.

    5. See Figure 5-27. Insert new sealing fasteners.

    6. See Figure 5-28. Tighten fasteners in sequence shown to 26-28 ft-lbs (35.3-38.0 Nm).

    7. Install the primary chain, clutch, and compensating sprocket as an assembly. See 5.4 DRIVE COMPONENTS,

    Installation.

    8. Install chain tensioner assembly.

    9. Install starter. See 7.8 STARTER, Installation.

    NOTE

    Always install a new gasket between primary chaincase cover and chaincase. Failure to replace this gasket may cause primary chaincase leaks.

    10. Install primary chaincase cover. Fill primary chaincase with lubricant. See 5.3 PRIMARY CHAINCASE COVER, Installation.

    11. Adjust rear belt tension.

    12. Connect negative battery cable.


  • 2015 Touring – PRIMARY CHAINCASE HOUSING – SHIFTER SHAFT BUSHINGS

    1. See Figure 5-24. Press out old bushings (1) using an arbor press. Inspect the bushing bore to verify that it is clean and smooth.

    2. Press new bushings into each side of the bore using an arbor press. Installed bushing must be flush to 0.010 in. (0.25 mm) below edge of bore.


  • 2015 Touring – PRIMARY CHAINCASE HOUSING – MAINSHAFT BEARING INNER RACE

    Removal

    NOTE

    Bearing outer race installation requires properly aligned bearing inner race. Use the recommended tool, MAINSHAFT BEARING INNER RACE REMOVER/INSTALLER (Part No. HD-34902-C).

    1. See Figure 5-22. Install end cap (2) into end of mainshaft.

    2. Position puller (3) around mainshaft, under bearing inner race.

    3. Turn forcing screw (4) clockwise while holding puller to remove bearing.

    Installation

    1. See Figure 5-23. Slide bearing inner race (1) onto mainshaft.

    NOTE

    Extension shaft has left-hand threads.

    2. Install extension shaft (2) onto end of mainshaft.

    3. Position installer sleeve (4) over extension shaft and against bearing inner race. Apply graphite lubricant to threads of extension shaft.

    4. Place two washers (5) over threaded portion of extension shaft and install nut.

    5. Tighten nut (6) while holding extension shaft stationary with wrench on flats (3) at end of screw threads. Press race onto shaft until edge of race contacts step on shaft.

    6. Lubricate race with SCREAMIN’ EAGLE ASSEMBLY LUBE.