Removal
NOTE
Never operate vehicle with the radio or upper support bracket removed. These components provide important structural support to the fairing. Damage to the fairing assembly can result if operated without these components installed.
1. Remove main fuse. See 7.3 SYSTEM FUSES AND RELAYS.
2. Remove outer fairing. See 2.42 OUTER FAIRING AND WINDSHIELD: FRAME MOUNTED FAIRING MODELS.
NOTE
Some connectors are not used on all models.
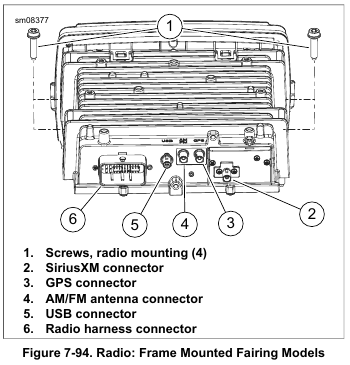
3. See Figure 7-94. Disconnect:
a. Radio harness connector (6).
b. USB connector (5).
c. AM/FM antenna cable connector (4).
d. GPS connector (3).
e. SiriusXM connector (2) (if equipped)
4. Remove four screws (1) to release radio from fairing support bracket.
5. Pull radio up and forward to remove.
NOTE
The XM module is very fragile and is sensitive to static discharge.
6. XM equipped:
a. Remove screws securing XM module in radio frame.
b. Transfer XM module into new radio immediately. If new radio is not available, place XM module in a static proof bag and store in a safe place.
c. Tighten screw securely.
Installation
1. Position radio on fairing support bracket and push toward opening in inner fairing.
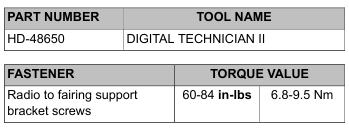
2. See Figure 7-94. Install four screws (1). Tighten to 60-84 in-lbs (6.8-9.5 Nm).
NOTE
Some connectors are not used on all models.
3. Mate connectors:
a. Radio harness connector (6).
b. USB connector (5).
c. AM/FM antenna cable connector (4).
d. GPS connector (3).
e. SiriusXM connector (2) (if equipped).
4. Install fairing vent and outer fairing. See 2.42 OUTER FAIRING AND WINDSHIELD: FRAME MOUNTED FAIRING MODELS.
5. Install main fuse. See 7.3 SYSTEM FUSES AND RELAYS.
6. If installing a new radio, it must be set up using DIGITAL TECHNICIAN II (Part No. HD-48650):
a.Choose the REFLASH icon.
b. Follow the on-screen prompts. If the vehicle has an amplifier, it must also be configured after configuring the radio.
NOTE
Instructions to check, download and install software are available in PDF format at www.harley-davidson.com/softwaredownloads.
7. Check software version:
a. Visit www.harley-davidson.com/softwaredownloads.
b. Compare the software version number to the online version number.
c. If the online version number is higher than the displayed version number, download and install the latest version.
Leave a Reply