
Ignition/Light Key Switch: Removal
1. Remove main fuse. See 7.3 SYSTEM FUSES AND RELAYS.
2. Remove seat. See 2.30 SEAT.
3. Remove console. See 4.6 FUEL TANK, Console.
4. See Figure 7-52. Disconnect ignition switch connector [33]. Release ignition switch conduit from plastic clip, if necessary.
5. Remove four screws to release ignition switch from console.
Ignition/Light Key Switch: Installation
1. See Figure 7-52. Install ignition switch. Tighten to 25-35 in-lbs (2.8-3.9 Nm) in a crosswise pattern.
2. Connect ignition connector [33]. Capture ignition switch conduit in plastic clip, if removed.
3. Using caution to avoid pinching wire harness and vent tube, install console. See 4.6 FUEL TANK, Console.

4. Install seat. See 2.30 SEAT.
5. Install main fuse. See 7.3 SYSTEM FUSES AND RELAYS.
Fork Lock: Removal
1. Remove handlebar clamp shroud. See 2.47 HEADLAMP NACELLE: ROAD KING MODELS.
2. Start acorn nuts on both the left and right side fork bracket studs to keep halves of headlamp nacelle on motorcycle.
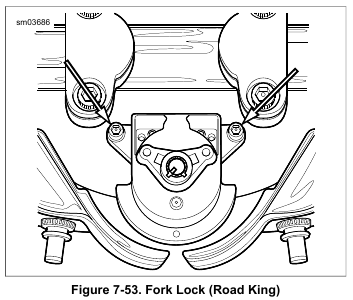
3. US models: See Figure 7-53. Remove two screws (with flat washers).
4. International models: Remove two break-away screws:
a. Center punch the top of each break-away screw.
b. Use a 1/8 inch left-handed drill bit. Set the drill to REVERSE and use to spin out the break-away screws.
NOTE
If the above method fails:
• Use a 3/16 inch bit to carefully drill off heads of break-away screws.
• Use pliers to remove remainder of screws once the switch is removed.
5. Remove fork lock assembly from upper fork bracket bore.
Fork Lock: Installation
1. See Figure 7-53. Position fork lock assembly into bore of upper fork bracket.
2. US models: Install two screws (with flat washers). Tighten to 36-60 in-lbs (4.1-6.8 Nm).
3. International models:
a. Verify that the threads in the upper fork bracket are clean and in good condition. Dirty and/or damaged threads may cause the heads of the break-away screws to snap off before the fork lock is properly tightened.
NOTE
Do not lose heads of break-away screws in motorcycle. Vibration may cause captured heads to scratch finished surfaces, chafe wires or cause other damage.
b. Install two new break-away screws (with flat washers).
Tighten until heads snap off.
4. Install handlebar clamp shroud. See 2.47 HEADLAMP
NACELLE: ROAD KING MODELS.
Leave a Reply