Removal
1. Remove right saddlebag.
2. Remove right side cover.
3. Remove battery. See 1.22 BATTERY MAINTENANCE.
4. Remove O2 sensor connector anchors.
5. Remove wheel speed sensor connector anchor, if equipped.
6. Remove ignition coil screws and battery hold-down bracket.
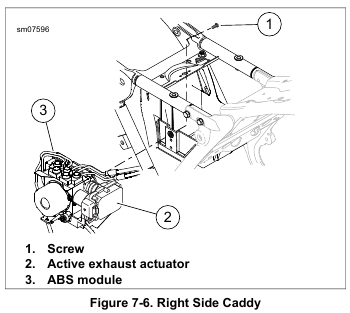
7. See Figure 7-6. Remove screw (1) securing right side caddy to battery tray.
8. Remove four screws securing battery tray to frame.
9. Disengage latch on bottom of caddy. Release caddy from dovetails while lowering battery tray into frame.
NOTE
Stud on bottom of ABS module is a tight fit in grommet. Considerable effort may be needed to remove module.
10. Loosen nuts securing ABS module assembly (3), if equipped. Remove ABS module from caddy.
11. Remove active exhaust actuator (2), if equipped. Disconnect cable from actuator. See 4.19 ACTIVE EXHAUST: HDI.
12. Remove caddy.
Installation
1. Install active exhaust actuator, if equipped. See 4.19 ACTIVE EXHAUST: HDI.
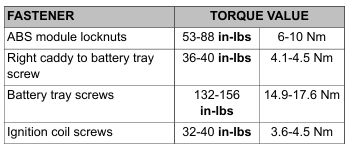
2. Install ABS module to caddy. Apply glass cleaner to grommets to aid installation. Tighten to 53-88 in-lbs (6-10 Nm).
3. Engage right side caddy onto dovetails while lifting battery tray up into position. Verify latch on bottom of caddy is engaged.
4. See Figure 7-6. Install screw (1). Tighten to 36-40 in-lbs (4.1-4.5 Nm).
5. Install four screws securing battery tray to frame. Tighten to 132-156 in-lbs (14.9-17.6 Nm).
6. Install battery hold-down bracket and screws to secure ignition coil. Tighten to 32-40 in-lbs (3.6-4.5 Nm).
7. Secure O2 sensor connector anchors. Locate the gray connector in the outboard position.
8. Secure the wheel speed sensor connector anchor, if equipped.
9. Install battery and top caddy. See 1.22 BATTERY MAINTENANCE.
10. Install seat. See 2.30 SEAT.
11. Install side cover and saddlebag.
Leave a Reply