Removal
1. Remove seat. See 2.30 SEAT.
2. Remove battery. See 1.22 BATTERY MAINTENANCE.
3. Remove screws securing left side caddy. Pull caddy away from frame while pulling rear fender lights harness out through battery tray.
4. Remove ignition coil screws and battery hold-down bracket. See 7.7 IGNITION COIL.
5. Remove screw securing right side caddy, if equipped.
6. Models without right side caddy: Release O2 sensor connectors from retaining devices.
7. Models without active exhaust: Remove actuator connector from cavity in battery tray.
8. Remove four screws securing battery tray to frame.
9. Models with right side caddy: Disengage latch on bottom of caddy. Release caddy from dovetails while lowering battery tray into frame.
10. Roll front of battery tray up and out of frame.
Installation
1. Roll rear of battery tray down into frame.
2. Models with right side caddy: Engage right side caddy onto dovetails while lifting battery tray up into position. Verify latch on bottom of caddy is engaged.
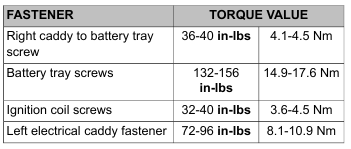
3. Install screw to retain caddy to battery tray. Tighten to 36-40 in-lbs (4.1-4.5 Nm).
4. Install four screws securing battery tray to frame. Tighten to 132-156 in-lbs (14.9-17.6 Nm).
5. Models without active exhaust: Install actuator connector to cavity in battery tray.
6. Models without right side caddy: Secure O2 sensor connectors to retaining devices.
7. Install battery hold-down bracket and screws to secure ignition coil. Tighten to 32-40 in-lbs (3.6-4.5 Nm).
8. Route rear fender lights connector through opening in battery tray and up through opening in frame. Secure left side caddy with screws. Tighten to 72-96 in-lbs (8.1-10.9 Nm).
9. Mate rear fender lights connector. Secure to retaining device.
10. Secure main harness to left top frame with two cable straps.
11. Install battery and top caddy. See 1.22 BATTERY MAINTENANCE.
12. Install seat. See 2.30 SEAT.
13. Install side covers and saddlebags.
Leave a Reply