Removal
D.O.T. 4 brake fluid will damage painted and body panel surfaces it comes in contact with. Always use caution and protect surfaces from spills whenever brake work is performed. Failure to comply can result in cosmetic damage. (00239b)
• If DOT 4 brake fluid contacts painted surfaces, IMMEDIATELY flush area with clear water.
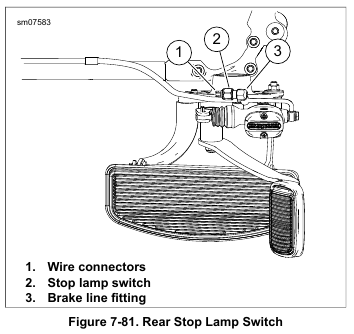
1. See Figure 7-81. Remove rear brake master cylinder:
a. Support front of engine.
b. Remove screws securing front right engine mount end cap.
c. Carefully pull off end cap mount with footboard, master cylinder and brake pedal attached. Allow to lay beside the vehicle.
2. Remove stop lamp switch connectors (1).
NOTE
Wrap banjo fittings with pieces of lint-free shop towel to absorb any loss of brake fluid.
3. Hold brake line fitting (3) and remove rear stop lamp switch (2).
Installation
1. Apply LOCTITE 565 THREAD SEALANT to rear stop lamp switch.
2. See Figure 7-81. Install rear stop lamp switch (2) into rear brake line fitting (3).
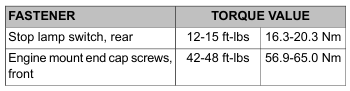
3. Hold brake line fitting and tighten to 12-15 ft-lbs (16.3-20.3 Nm).
4. Install rear brake master cylinder:
a. Support front of engine.
NOTE
Confirm oil switch/sender wires are inboard of rubber mount.
b. Remove screws securing front right engine mount end cap.
c. Install stop lamp switch connectors (1).
d. Install engine mount end cap. Tighten to 42-48 ft-lbs (56.9-65.0 Nm).
5. Bleed brake system. See 2.18 BLEEDING BRAKES.
Be sure that all lights and switches operate properly before operating motorcycle. Low visibility of rider can result in death or serious injury. (00316a)
6. Verify tail lamp and stop lamp operation.
Leave a Reply