Removal
NOTES
• Indicator lamps are Light Emitting Diodes (LEDs). If one LED fails, the indicator lamp assembly must be replaced.
• Indicator lamp assembly is part of the console harness assembly and not serviced separately.
1. Remove main fuse. See 7.3 SYSTEM FUSES AND RELAYS.
2. Remove seat. See 2.30 SEAT.
3. Remove console. See 4.6 FUEL TANK, Console.
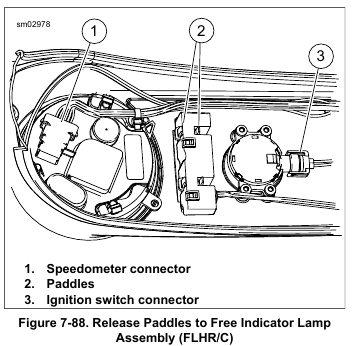
4. See Figure 7-88. Disconnect ignition switch connector (3) and speedometer connector (1).
5. Free harness from metal clips.
6. Remove indicator lamp assembly from console:
a. Insert the blade of a large screwdriver under rear corner of indicator lamp assembly.
b. Squeeze front and rear paddles (2) on same side of assembly while rotating screwdriver.
c. When one side of assembly becomes free, repeat procedure on opposite side to release unit from console.
Installation
1. Install indicator lamp assembly into console:
a. Place assembly into position in console. Engage four paddles in slots of indicator lamp assembly.
b. While pushing down on assembly, push up on lens on outboard side of console until assembly fits snugly.
2. Mate speedometer connector and ignition switch connector. Secure harness under metal clips to capture harness.
NOTE
Avoid pinching wire harness and vent tube while installing console.
3. Install console. See 4.6 FUEL TANK, Console.
4. Install seat. See 2.30 SEAT.
5. Install main fuse. See 7.3 SYSTEM FUSES AND RELAYS.
Leave a Reply