Removal
NOTE
This headlamp assembly contains no service parts including bulbs and rubber boots. Replace the entire assembly.
1. Remove outer fairing. See 2.42 OUTER FAIRING AND WINDSHIELD: FRAME MOUNTED FAIRING MODELS.
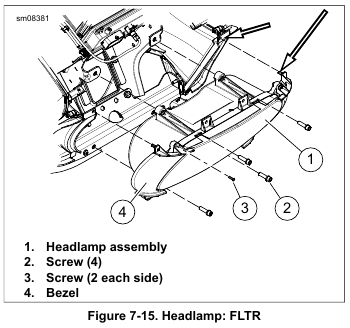
2. See Figure 7-15. Remove four screws (2).
3. Remove headlamp assembly. Disconnect headlamp connector.
4. If necessary, remove screws (3) to remove bezel (4) from each side of headlamp assembly.
Installation
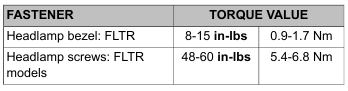
1. If removed, secure bezel (4) with screws (3) to each side of headlamp assembly. Tighten to 8-15 in-lbs (0.9-1.7 Nm).
2. Install headlamp connector.
NOTE
Verify that pins engage hole in vent housings (arrows) during headlamp installation.
3. Secure headlamp assembly with four screws (2). Tighten to 48-60 in-lbs (5.4-6.8 Nm).
4. Install outer fairing. See 2.42 OUTER FAIRING AND WINDSHIELD: FRAME MOUNTED FAIRING MODELS.
Leave a Reply