Removal
1. Remove seat. See 2.30 SEAT.
2. Remove saddlebags. See 2.31 SADDLEBAGS.
3. Remove side covers.
4. Remove battery. See 1.22 BATTERY MAINTENANCE.
5. Remove two screws securing battery hold-down bracket and ignition coil.
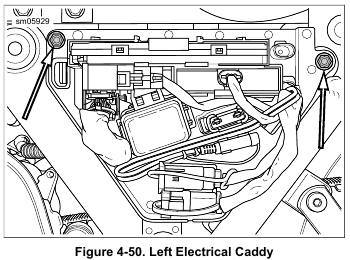
6. See Figure 4-50. Remove screws securing left side caddy to frame.
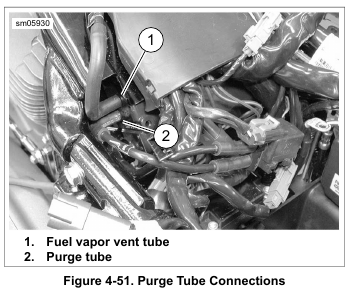
7. See Figure 4-51. Disconnect fuel vapor vent tube (1) from canister fitting marked “TANK.”
8. Disconnect purge tube (2) from canister fitting marked “PURGE.”
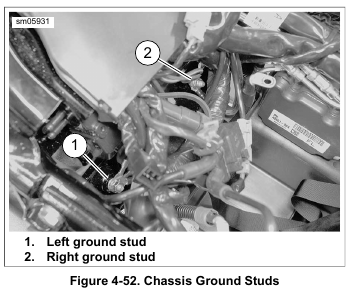
9. See Figure 4-52. Remove three ground ring terminals from left ground stud (1).
10. Remove two ground ring terminals from right ground stud (2).
11. Remove two screws to release charcoal canister from frame crossmember.
12. Guide canister down into battery tray, right end first, and remove.
Installation
1. Slide the charcoal canister under electrical harnesses, fitting end first, and work into place.
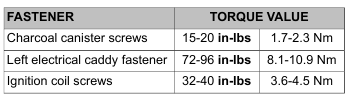
2. Secure canister with two screws. Tighten to 15-20 in-lbs (1.7-2.3 Nm).
3. See Figure 4-52. Install three ground ring terminals on left ground stud (1).
4. Install two ground ring terminals on right ground stud (2). Place battery chassis ground terminal on stud first.
5. See Figure 4-51. Connect purge tube (2) (charcoal canister to purge solenoid) to lower canister fitting marked “PURGE.”
6. Connect fuel vapor vent tube (1) (vapor valve to charcoal canister) to upper canister fitting marked “TANK.”
7. See Figure 4-50. Install left electrical caddy with two fasteners. Tighten to 72-96 in-lbs (8.1-10.9 Nm).
8. Check all routings to be sure that tubes are not pinched or kinked, and that there is no contact with hot exhaust or engine parts.
9. Secure battery hold-down bracket and coil with two screws.
Tighten to 32-40 in-lbs (3.6-4.5 Nm).
10. Install battery. See 1.22 BATTERY MAINTENANCE.
11. Install side covers.
12. Install saddlebags. See 2.31 SADDLEBAGS.
13. Install seat. See 2.30 SEAT.
Leave a Reply