1. Remove seat. See 2.30 SEAT.
To prevent accidental vehicle start-up, which could cause death or serious injury, disconnect negative (-) battery cable before proceeding. (00048a)
2. Remove battery negative cable (black) from battery.
3. Remove the primary chaincase. See 5.5 PRIMARY CHAINCASE HOUSING.
The high-output rotor contains powerful magnets. Exercise caution to prevent possible hand injury during removal and installation. (00558b)
4. Disconnect stator connector from voltage regulator. See 7.20 VOLTAGE REGULATOR.
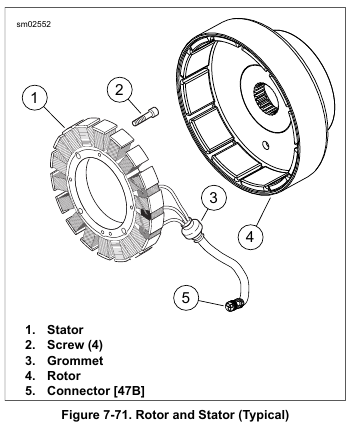
5. See Figure 7-71. Remove alternator rotor (4). Use two bolts inserted through the holes in the rotor face to aid during removal.
6. Cut anchored cable strap securing stator wiring to frame.
NOTE
The rubber molded stator connector is not serviceable. Replace parts as necessary.
7. Remove four screws to free stator from crankcase. Discard screws.
8. See Figure 7-72. Using point of awl or small screwdriver, carefully move grommet away from crankcase and squirt isopropyl alcohol or glass cleaner into opening. Repeat this step at one or two other locations around grommet.
9. Push on the grommet from outside of crankcase while pulling through the bore with needle nose pliers. Do not pull on the wires unless the stator will be replaced. Exercise caution to avoid damaging ribs on grommet if stator is to be reused.
10. Draw conduit and connector through crankcase bore as stator is removed.
Leave a Reply