
Checking Piston Ring Gap
NOTES
• Always use new piston rings. Piston rings take a definite set and must not be reused if the engine has been operated. Always deglaze (or hone) the cylinder before installing new rings.
• Insufficient ring gap may cause the ends to abut at operating temperatures. This will result in ring breakage, cylinder scuffing and/or piston seizure.
• Excessive ring gap results in high oil consumption and blow-by of exhaust gases. Blow-by contaminates the oil supply and leaves sludge in the crankcase. It also reduces engine efficiency by weakening the combustion seal necessary for efficient transfer of energy to the piston.
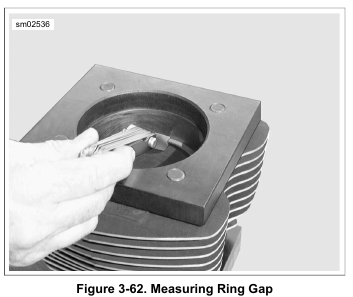
1. See Figure 3-62. Check ring end gap of each ring before placing on the piston. Insert the new ring into the cylinder and square it in the bore using the top of the piston.
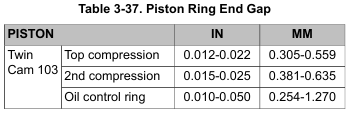
Measure the ring end gap with a feeler gauge. Refer to Table 3-37.
NOTE
Ring end gap dimensions also apply to oversize rings. Replace ring if end gap exceeds specification. If end gap is under specification, filing is permissible.
2. Use compressed air to remove any dirt or dust that may have settled in the oil drain holes and piston ring grooves.
Installing Piston Rings
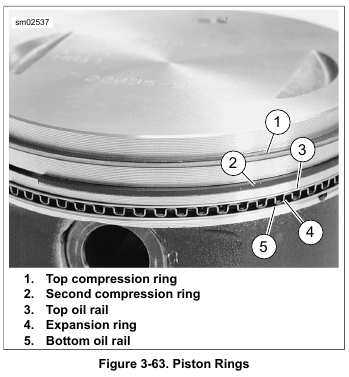
1. See Figure 3-63. Apply clean engine oil to three piston ring grooves.
2. Install expansion ring (4) into third ring groove.
3. Spiral bottom oil rail (5) into space below expansion ring (4). Position gap 90 degrees from the gap in the expansion ring.
4. Spiral top oil rail (3) into space above expansion ring (4).
Position gap 180 degrees from the gap in the bottom oil rail.
NOTES
• Use the proper piston ring spreader to prevent excessive ring twist and expansion. Over expansion may cause the ring to crack. Damaged or distorted rings result in blow by of exhaust gases. This will result in increased oil con-
sumption and lower service life on valves and other components.
• Installing the second compression ring upside down will cause oil to be scraped up into the combustion chamber. This will result in excessive oil consumption and lower service life on valves and other components.
5. Using PISTON RING EXPANDER (Part No. Snap-on PRS8), carefully install the second compression ring. Make sure the dot (punch mark) near the ring gap faces the piston crown. Rotate the ring so the gap is 180 degrees from the gap in the oil expansion ring.
6. Install the top compression ring. Make sure the dot (punch mark) near the ring gap faces the piston crown. Rotate the ring so the gap is 180 degrees from the gap in the second compression ring.
7. Rotate the three piston rings using the palms of both hands. The rings must rotate freely without sticking.
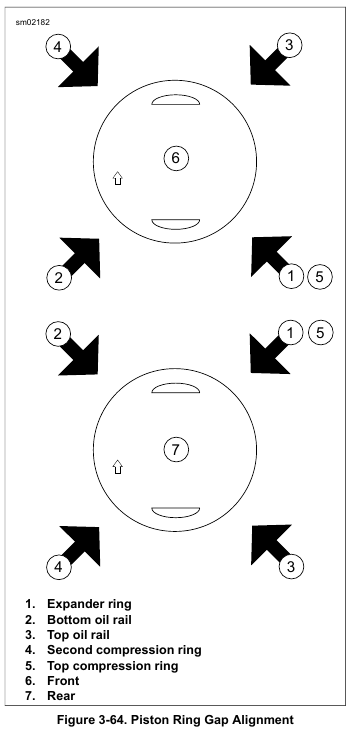
8. See Figure 3-64. Verify the ring gaps are still properly staggered.
Leave a Reply